Just Launched! — Account Level Custom Fields
Iteration is a concept product managers know well. We all look at our products and constantly think about what we could add or change to make them work better. And often times our users tell us exactly what they need.
We are fortunate at Aha! because we work closely with you — the most innovative product builders in the world. So when you tell us that something could work better, we listen.
Lately, we have heard a lot about custom fields. Custom fields in Aha! allow you to capture data that is important to your business but not a part of the application by default. For example, you might want to track “expected revenue” for a feature or whether a release needs release notes. We know that custom fields are highly flexible and widely used — but all of that flexibility caused problems for some of you.
That is why we changed the way that custom fields are configured and managed by moving them from the product level to the account level. There are many benefits for this change which we shared with you last week, including more control over where custom fields appear across your account and easier reporting.
Do you already have custom fields set up? No need to worry. We migrated existing custom fields up to the account level for you. And you and your team should be able to use them throughout your account just as you were. But note that we migrated over 125,000 of your custom fields, so please check your screen layouts (in particular in Ideas portals and Personas and Competitors) to make sure all is well.
This is an important change to the way custom fields work, but you should still think about them the same way as before.
To add a new one, you need to:
Select the type of custom field you want and give it a name.
Define how you want it presented on the screen (this is now called custom field layouts).
Select the product(s) that will use the custom field by choosing its custom field layout.
You may appreciate that all custom fields can now be viewed in one place: Settings Account Custom Fields. When you are ready to add new custom fields or make changes to existing ones, here is what you should do:
Manage custom fields permissions With custom fields at the account level, you will need Administrator permissions to manage the configuration screens via the Customizations rights. The recent introduction of new Administrator roles means that Customizations administrator rights can be granted without exposing billing, security, and other key account information.

Grant “Customizations” permissions by navigating to Settings Account Users Edit User.
Create a custom field Custom fields are extremely powerful and allow you to capture data that is unique to your company. When you are ready to add a new custom field, select + in the section where you would like to add it and define the name of the field along with its type.

With custom fields now at the account level, you create a custom field once and it is available to use across many products.
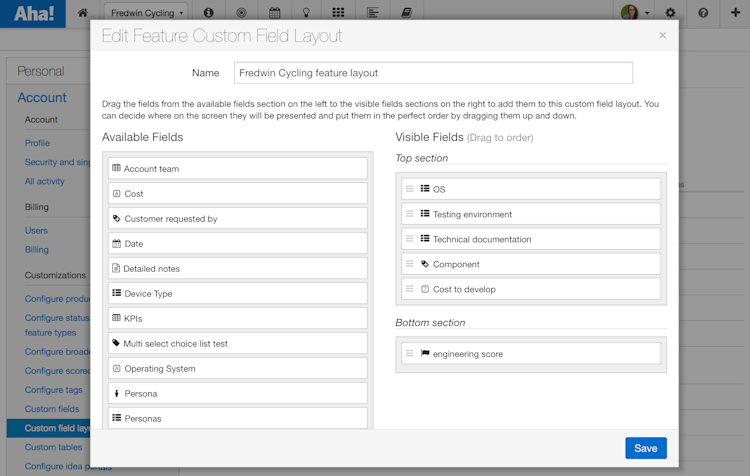
Add the custom field to a custom field layout Once a custom field is created, you need to add it to a custom field layout. What is a layout? It’s how you determine where you want custom fields to appear on the screen. During the migration, we automatically created layouts based on your existing configuration.
But you might want to make changes in the future. To modify a layout, select Edit and drag a custom field from the Available Fields column to the Visible Fields column. Drop your custom field into the section where you want it to appear, in your preferred order. To remove a field, simply move it back over to Available Fields and it will no longer be visible in that layout.

Administrators with “Customizations” permissions can configure layouts by navigating to Settings Account Custom field layouts.
Assign the layout to your product Now that you have your layout defined, it is time to determine which products it will apply to. This is managed by Product Owners in Settings Product Configure. Once you are on the configuration page, navigate to the Custom fields section. There, you can choose whether each product will use the layout inherited from its product line or apply a different one.

During the migration, custom field layouts were automatically configured based on existing usage. You will continue to see the same custom fields on the same screens unless you decide to change them.
Custom fields are an important part of managing your products and projects. You now have greater control in managing custom fields across your entire product portfolio because they are at the account level.
Our awesome Customer Success team of former product managers (who respond to all support requests in under two hours) is here to help. If you have questions about the custom field migration or any of the changes, email us at support@aha.io.
Signup for a free Aha! trial — be happy Account level custom fields are available to all Aha! customers. If you are not already an Aha! customer, you may want to sign up for a free 30 day trial of Aha! now to see why over 50,000 users trust Aha! to set product strategy, create visual roadmaps, and prioritize releases and features.
